

Introduction
This article revolves around how to recover deleted photos from Mac. Photo loss is inevitable; while organizing systems and deleting duplication, sometimes, we accidentally delete our photos, which leaves us deeply troubled. But with the advancement in technology, photo recovery is not a problem anymore, especially when we are talking about technology giants such as Mac. It offers its users special applications, potent hardware, and numerous photo management and editing apps. We will discuss some ways of recovering lost photos from Mac. Besides, there is plenty of photo recovery software available, but we will discuss the most effective and rapid one, i.e., Wondershare Recoverit.
Part 1: Reasons for Photo Loss on Mac
Photo loss is an unavoidable situation that can occur at any time. Although losing photos or data is not an unsolvable scenario in this time and age, it can be extremely daunting. Thus, having photo recovery software at hand is always advisable. There are plenty of reasons for photo loss. Some of the most common ones are discussed below.
- Carelessness Leads to Accidental Deletion
We all are aware of this reason and have gone through it at least once in our lives. The most common reason behind photo loss is accidental deletion which usually occurs when we regulate our PCs or remove redundancy. Photo recovery is not an issue if done accidentally; however, the recovery process needs to start as soon as possible. - Photo Editing Causes Deletion
Mac consists of plenty of photo editing apps, and the users mostly edit their photos using these apps. Still, one mistake most of them make is they edit original images instead of copies. It only takes a single crash of the app, and the original photos are corrupted and become unreadable. That is why it is always good to edit the copy of the original image so that you have original images in any mishap. - Virus and Malware Infection
It is a common notion that Macs are prone to malware and virus attacks. It was only until the ransomware infection wave took over that it forced Mac users to think otherwise. This virus affects the machine and causes data corruption and deletion. - Physical Damage
Undoubtedly, Mac has exceptional build quality with premium materials and ground-breaking construction. Moreover, Mac users are susceptible to their machines, but it has some very sensitive minute components that get damaged if they come in contact with water or hard flooring. Thus, this damage can lead to photo loss, which makes you worrisome and raises the problem of how I recover deleted photos from Mac? - Hard Drive Formatting
Incorrect formatting can also result in data and photo loss. During Mac device installations and system updates, sometimes unexpected formatting can lead to a need for photo recovery software.
Part 2: Recover Permanently Deleted Photos from Mac
There are plenty of ways you can help you recover deleted photos from your Mac before jumping onto photo recovery software. The discussion of the three most basic methods is given below.
Method 1: Use the Mac Photo App
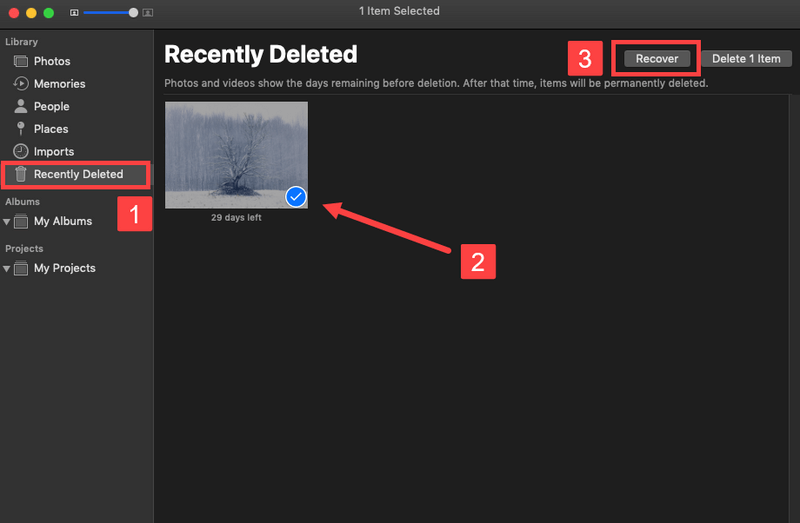
The photo app is an in-built tool on Mac that helps classify, manage, arrange, and store photos. If you have accidentally deleted your pictures, do not panic, as the photo app has covered it for you. It stores the images in the ‘recently deleted’ album for 30 days, after which they get deleted from there. The step by step process to use the Mac Photo App is given below:
- Open Photos, select albums from the left column, and double-click ‘recently deleted.’
- The thumbnails of the photos that you have deleted will appear with the number of days left for them before they disappear from the photo app as well.
- Now, click the ‘recover’ option present at the top right of your mac screen. Go back and check the original album from where the photo got deleted, and enjoy!
Method 2: Retrieve Photos from Mac Trash
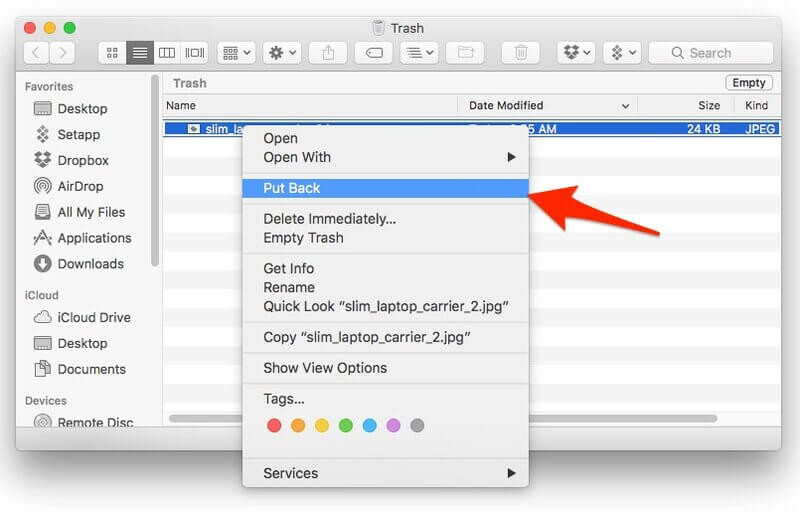
It is the most common and easy way of photo recovery that everyone uses. The process is as follows:
- Open the Trash Bin icon on your Mac desktop.
- Navigate to the picture you want to recover and drag it to the desired folder or right-click on the image and select the ‘put-back’ option to retrieve it.
Method 3: Utilize iCloud
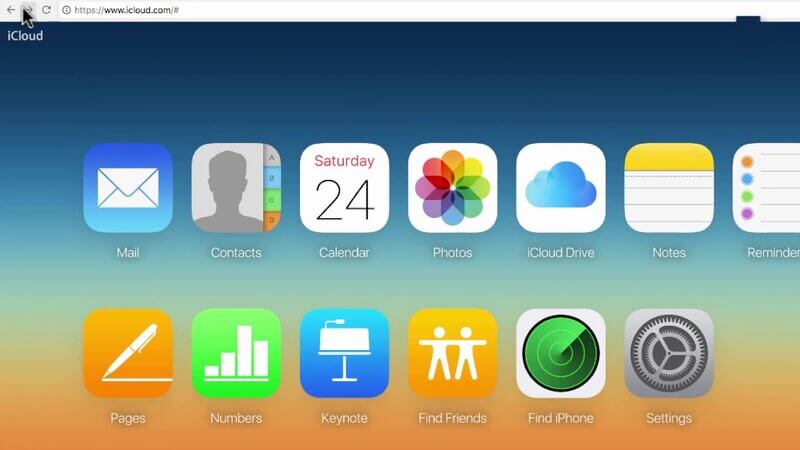
A vast majority of people utilize iCloud as a focal vault for storing everything from calendars to pictures. It is Apple’s backup service, where you can keep your data and use it on all your Apple devices. Like the Photo App, the images are not saved in the iCloud forever. They will be deleted after 40 days to free up your iCloud storage memory.
- Go to iCloud via any browser (https://www.icloud.com/) – You might require a sign-in.
- Click ‘photos’ icon > Albums > recently deleted Album
- The first is to select the photos you want to retrieve and click ‘Recover.’
Part 3: Recover Deleted Photo files with Wondershare Recoverit
If none of the previous recovery solutions work, try using Wondershare Recoverit software. It is highly reliable, safe, user-friendly, and efficient data recovery software that can recover all sorts of data from your systems. This part of the article will deal with the process of retrieving photos step-by-step.
Recoverit Mac photo Recovery software allows you to recover deleted photos from Mac with great ease and utmost efficacy. The advanced version of Mac photo recovery software will enable you to recover deleted images in multiple image file formats, including JPEG, GIF, PNG, TIFF/TIF, PSD, ORF, BMP, RAF, RAW, MRW, etc. Additionally, this software executes a deep scan to recover photos deleted due to various data loss situations that Mac built-in software cannot perform.
To recover deleted photos from Mac, all you need to do is download and install Recoverit Mac photo recovery software and follow the simple steps mentioned below:
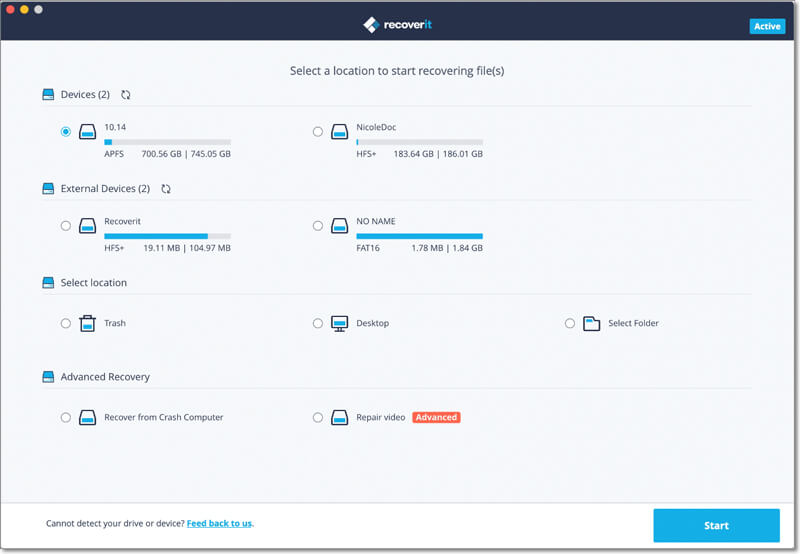
Step 1: Select the Location
Launch the installed Recoverit Mac software. To recover deleted photos from Mac, select the location from where you accidentally deleted the images. Click “Start” to initiate the recovery procedure.
Step 2: Scanning
Recoverit will automatically start an all-around scan to piece all lost files together. The scan can last for several minutes to a few hours, depending on the size of the partition.
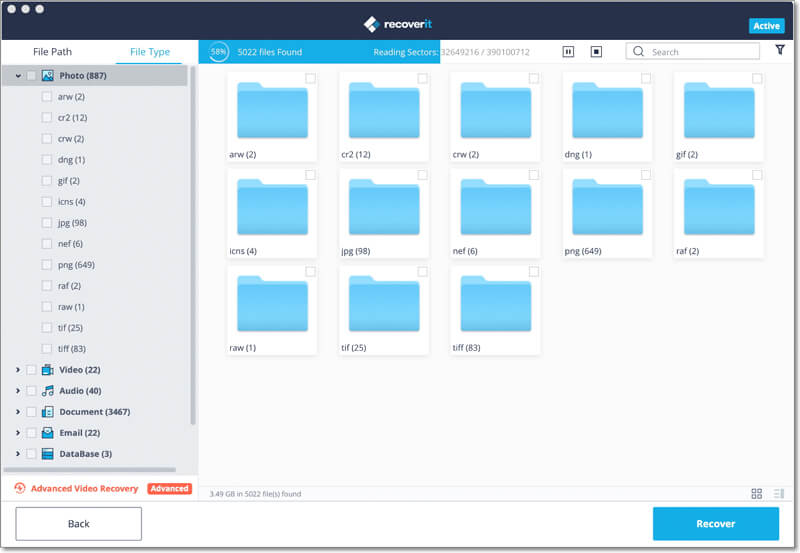
Step 3: Preview and Recover Deleted Photos
Soon after the scan is completed, a window will appear that will have all the recovered photos. You can preview the images, keep the ones you want and click ‘Recover’ to save them on your Mac.

Conclusion
The photos carry some of the most memorable moments of our lives. We live and enjoy those moments every time we sit and go through them. They are a source of continuous entertainment and fulfillment for us. Losing these valuable assets can cause a lot of distress. You can avoid photo deletion by taking the necessary precautions as photo recovery is difficult too on Mac.
Still, if you find the need to recover deleted photos from Mac, Wondershare Recoverit Mac photo recovery software should be your absolute choice. It is the most efficient, user-friendly software that recovers photos with consummate effectiveness, speed, and reliability.