

Photography does not focus only on capturing the moment; it also goes further to make the captured photo shine and appeal to viewers. Therefore, if you want to excel in photography as a photographer, you must master the skill of post-processing to improve your images and create more stunning images that capture the eyes and attention of your audience.
In this article, I will explore some of the secrets of post-processing and how you can use it to enhance your photos through editing. Whether it’s the colour, exposure, contrast, or sharpness you want to adjust, or maybe you would like to add some creative effects to your photos, this article will show you how to use various post-processing tools to make your photos look more amazing and eye-catching. So, please sit back; let’s delve in.
Understanding the Basics of Post-Processing
It is essential you understand what post-processing all about as a photographer before you can use it to work wonders in your photos. Post-processing involves modifying and enhancing your pictures after taking them to improve the image’s quality, appearance, and mood. Post-processing also helps correct any errors or flaws that may have occurred during the shoot.

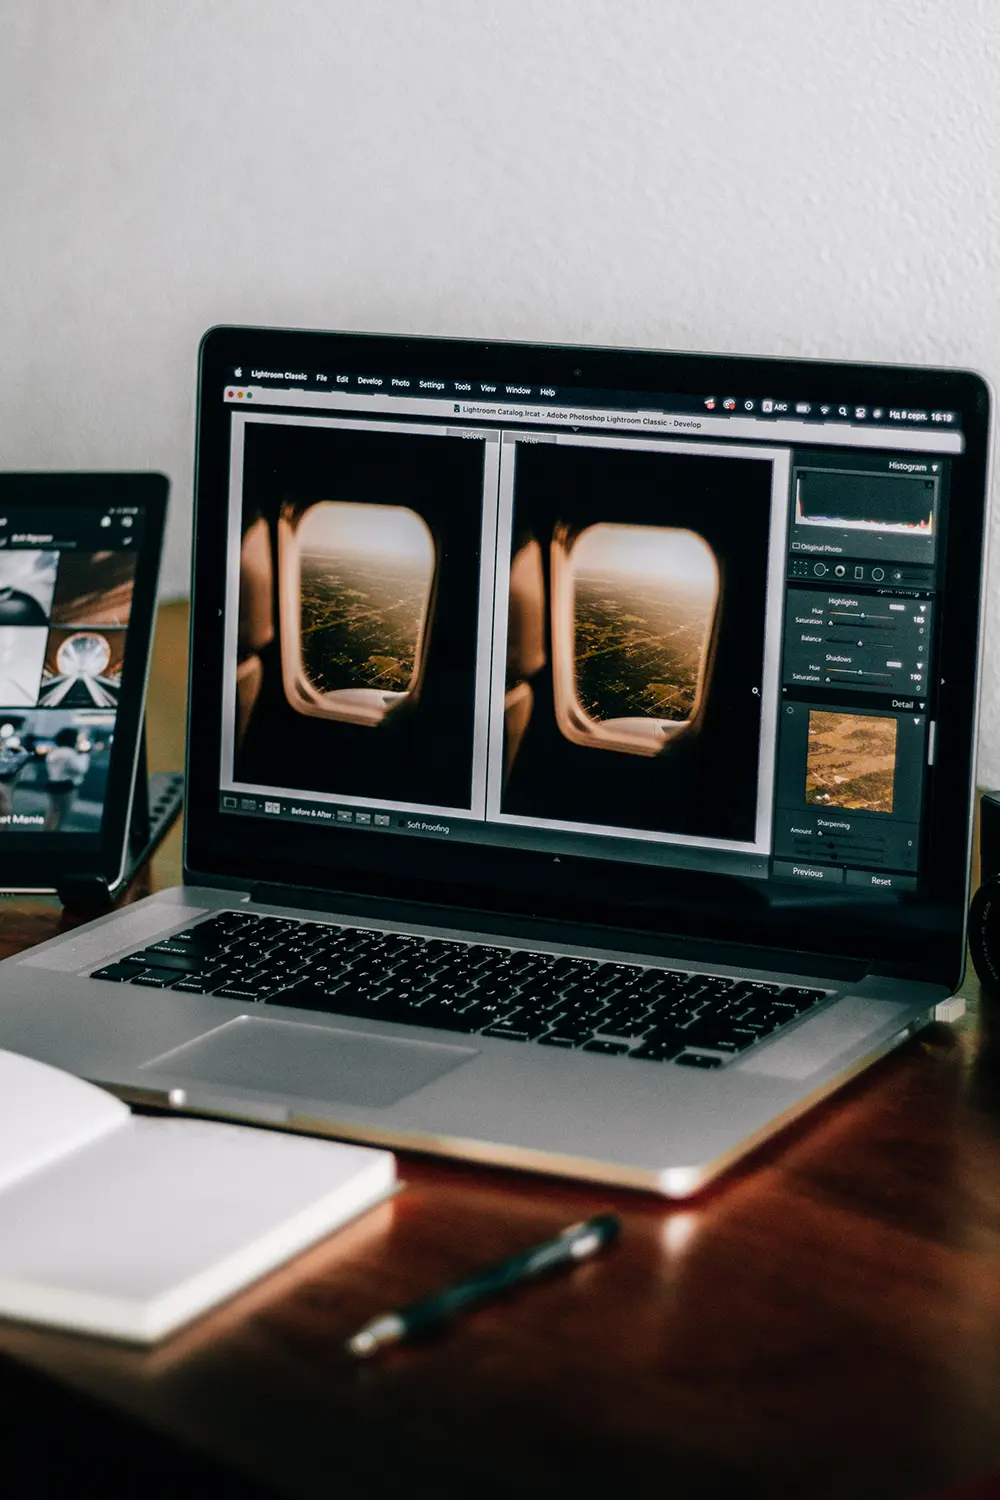
Also, post-processing helps you express your artistic vision and style better while creating unique and original effects in your photos. Various tools and software can be used for post-processing, such as Adobe Photoshop, Lightroom, GIMP, Snapseed, etc., each with its features and functions, enabling photographers to choose from them according to their needs and what they seek to achieve.
Essential Editing Techniques
One of the most crucial aspects of post-processing involves editing your photos to optimize exposure, tonal balance, or colour correction. Exposure refers to the amount of light that reaches the sensor, thus affecting the brightness and contrast of the image. At the same time, the tonal balance is the quality of your photo that talks about the distribution of light and dark areas in your image and affects the mood and atmosphere of your photo. You can use this guide for natural light photography to learn how to get the best exposure for different timers of the day.
On the other hand, colour correction is a process that involves adjusting the hue, saturation, and temperature of your image in a way to affect the realism and harmony of your photo. These parameters can be adjusted using various tools and sliders such as histograms, levels, curves, vibrance, white balance, etc. This is one of the techniques you can employ to edit your photos after shooting.
The other one involves enhancing the sharpness and clarity of your image. While sharpness refers to the degree of edge definition and detail in your image and affects the focus and quality of your photos, clarity talks more about the amount of contrast and texture in your image. It affects the depth and dimension of the picture. Some tools that can improve these aspects include sharpening, noise reduction, clarity, and dehaze.
Finally, you can also retouch and remove distractions or unwanted elements from your image. This helps you to clean up your image, drawing attention to your main subject. There are several tools available for this purpose, including healing brush, patch tool, clone stamp, content-aware fill, etc.
Creative Editing Approaches
To add some flair and personality to your photos, you need to be creative as a photographer to transform your images into something extraordinary and make them stand out. One of the easiest ways to achieve this is by using artistic filters and presets to change the look and feel of your image in one click. Presets and filters refer to pre-made settings that apply various adjustments and effects to your image, making them look more stunning.
These settings include vintage, cinematic, grunge, sepia, etc. and can be found online or created yourself. Alternatively, you can explore black-and-white conversions and HD imaging to create stunning images. This effect can be achieved by controlling the tones and colours of your image using tools like the black and white mix, tonal contrast, and split toning to create an image with a timeless and dramatic look.
HDR imaging combines multiple exposures of the same scene, creating an image with a high dynamic range. This means a greater range of dark and light values and can create a vivid and realistic picture with enhanced details and colours using several tools such as HDR merge, tone mapping, and exposure blending.
Lastly, you can utilize selective editing and creative techniques to manipulate specific parts of your image or create new effects. The selective technique allows you to apply adjustments to only certain areas of your image using tools like adjustment layers, masks, and gradients.
In contrast, creative techniques involve creating new elements or effects in your image, such as adding texts, frames, or reflections. Various tools that can be employed for this purpose include text tools, shape tools, blending modes, layer styles, etc.
Developing Your Editing Style
Your editing style refers to how you edit your photos to create a particular mood, atmosphere, and aesthetic, reflecting your vision and personality as a photographer. Having a personal editing style helps you establish your brand and identity as a photographer, making your photos more recognizable and memorable.
Developing your editing style involves trying different styles to determine what works best for you. You can try out different filters, presets, techniques, etc., to see how they affect your image and analyze what you like and dislike about them. You can also watch and follow other photographers with their distinctive styles and draw inspiration from them. Watch their videos and tutorials, read their blogs, and copy their style.
Rather than imitating directly, use it as a reference to create your style adapted to your goals and preference. Although time-consuming, developing your editing style is worth every effort, making your photos more unique and expressive. Who knows, with consistent efforts, you might even make a wallpaper that perfectly encapsulates your distinctive style!
Advanced Techniques for Specialized Editing
These can help you take your post-processing skills to the next level and help you create more stunning and professional results. An example of this technique is retouching, which involves enhancing and improving the appearance of your subjects or objects in your image. This technique can be used in portraits and conceptual purposes such as smoothing skin, whitening teeth, removing blemishes, and altering facial features using tools such as liquefy, dodge, and burn.
Image manipulation is another advanced technique for specialized editing and is the process of changing or combining images to create a new or different reality. This technique can be used for creative and artistic purposes, such as adding or removing elements and changing backgrounds and can be achieved with tools like transform, warp, and puppet warp.
A third technique is creating effects with blending modes and masks. This involves changing how layers interact and affect each other in your image. It can be used for various purposes, such as adding light and colour effects, creating contrast and drama, or adding gradients and patterns. Some tools that can be used to achieve this are blending modes, clipping masks, and layer masks.
Preserving Authenticity in Post-Processing
While you seek to create stunning photos with post-processing techniques, you also want to be aware of the ethical questions that may arise from using these techniques. You want to avoid “too much editing”. Manipulation or deception and seek to preserve the authenticity and integrity of your photos and subjects.
There is no definite solution to these challenges as different situations and contexts may require different approaches and judgements. However, balancing enhancement with natural representation presents a possible guideline to these challenges. This means that you have to remain conscious of your photos’ originality and realism while enhancing them to make them look better.
It also means that while you seek to correct some errors or add some flair to your photos with post-processing, you must be careful not to change facts, mislead viewers, or create false impressions, nor disrespect or harm your subjects or their dignity while trying to express your artistic vision and style. All these will help you preserve authenticity in your photos while also sticking to the ethical boundaries of post-processing.
Workflow and Organization Tips
Post-processing can be overwhelming and time-consuming if you don’t have a good workflow and organizational system, thus making them imperative for a seamless process. Workflow refers to the sequence of steps you follow to edit your photos, while an organizational system refers to how you store and manage your edited files. Efficiency in these areas will help you keep track of your work, avoid mistakes, and save time. Here are some tips for an efficient workflow and organizational system:
- Import your photos to your computer and create a folder for each project or session. Use a consistent naming convention for your folders.
- Review and choose your photos using a picture viewer or browser, such as Adobe Bridge, FastStone Image Viewer, or XnView. Mark your favorites or rejects and delete unwanted photos to free up space.
- Utilize your chosen photo-editing program, such as Snapseed, GIMP, Lightroom, Adobe Photoshop, or Adobe Photoshop Elements. Speed up your editing process and use non-destructive editing processes to preserve the original quality of photos.
- Export your images in the appropriate size and format for the web, print, or social media platforms with which you wish to utilize them. Use a consistent naming convention for your files and add metadata such as description, title, or keywords.
- Utilize a picture manager or organizer, such as Adobe Lightroom Classic, ACDSee Picture Studio, or digiKam, to arrange and manage your modified files. Group and sort your files, and use filters, tags or searches to access your files easily.
- To avoid data loss or corruption, back up and archive your photos. Use an external drive, cloud storage, online backup service, or file synchronization tool such as Dropbox or Google Drive to store copies of your original and edited files.
Showcasing the Power of Post-Processing
One way to showcase the power of post-processing is by using before and after samples. These samples help you to compare your photos and demonstrate how editing can transform and improve your photos. These samples can also be used to highlight your skills and show your work’s quality to viewers and clients.
Additionally, you can use these samples to learn from other photographers and get inspired by their methods. Many photographers have achieved devastating results and transformation of their photos using post-processing techniques. You can draw inspiration from their success stories for your post-processing exploits.
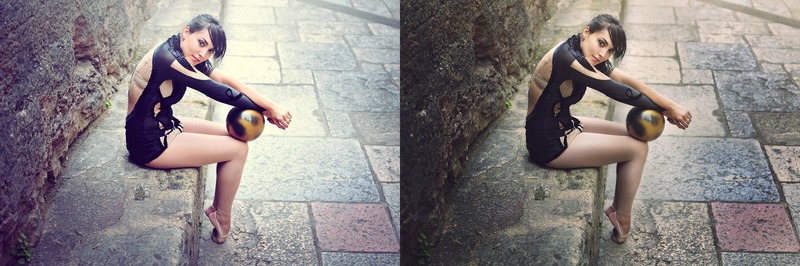

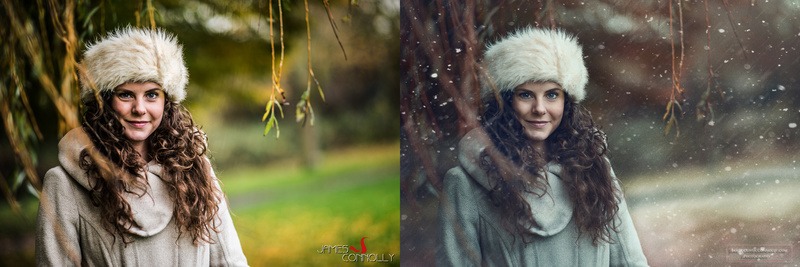
Furthermore, before and after samples can be used to show the transformative potential of post-processing in various photography genres. Using these samples, you can see how post-processing enhances the beauty and drama of nature, the story and atmosphere of urban scenes, the personality and emotion of people, etc., thus showcasing the power of post-processing to make your photos more stunning.
Conclusion
The quality and appearance of your images can significantly change after post-processing, an essential component of photography. You may fix mistakes, enhance details, and add flair to your photographs with post-processing. Additionally, you may utilize post-processing to make amazing and unique effects and convey your personality and sense of style.
This article covers some fundamental and more complex editing techniques to help you improve your images. We urge you to investigate and test various editing programs and techniques to see what works optimally for you and your pictures.
Keep in mind that editing your images improves their appearance and gives them a more personal touch. Using post-processing, let your imagination run wild and enhance your photos. So, enjoy it, and let your images do the talking!