

There are a million-plus blogs and tutorials out there on how to get started with Photoshop. Yet I know many people who are frustrated with Photoshop, and I think it’s because Photoshop is a very powerful image editing application with a world of possibilities. Even for experts, there is no way they can be fluent in everything that can be done in Photoshop.
So instead of allowing yourself to be overwhelmed and frustrated by trying to wrap your head around everything Photoshop can do, let’s just start with what you need to know in order to get started.
First of all, whether you just want to take better pictures for your own enjoyment, or you plan on selling images as art or stock images, when you are out doing photography, you should always shoot in RAW format if your camera has that capability. I’m sure 99% of you reading this have already heard this, but for you 1%, RAW files contain more information and give you more control when editing images in Photoshop. You can search the internet for more information on this as it’s a well-covered topic.
If you start with the RAW image, a window will come up with multiple settings you can use to adjust the image. You should be able to see two words you can click on: AUTO and DEFAULT. If you click AUTO, Photoshop will automatically correct the image for you. If you don’t like the change, DEFAULT will toggle the image back. There are sliders for Exposure, Contrast, Highlights, and so on. You can adjust these to your liking.
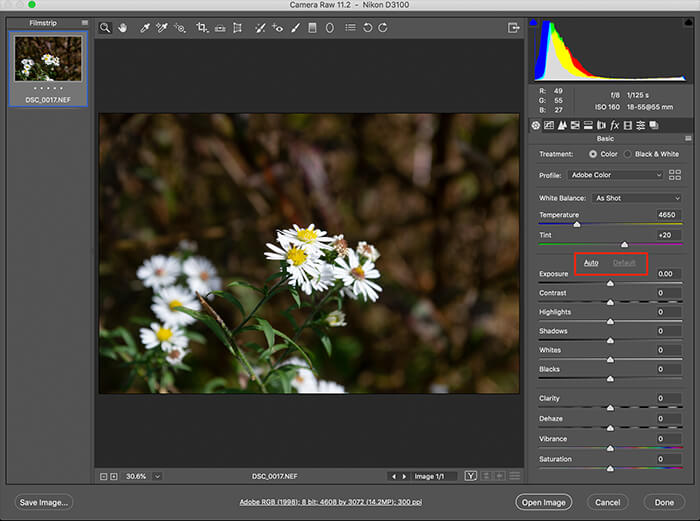
Near the top of the pane is a series of icons. Clicking on these will bring up additional features and functions. Once you’re familiar with these functions, you can develop a workflow that you’re happy with when you begin the initial steps of your image processing. And don’t worry about all these different options, you only need to use a few of these when adjusting images at the start once you know what works best for you. Also, don’t worry about any functions that seem complicated. The simple, intuitive functions are all you need but it wouldn’t hurt to experiment with the others.
When you’re done making adjustments, click on the OPEN IMAGE button on the bottom and you’re ready to perform additional image editing.
For you people just starting out in Photoshop, the SPOT HEALING BRUSH tool will work wonders for removing specks and scratches. Lint on clothing, stray hairs, stains on the wall, and blemishes on skin, they are all easily removed with this tool. You can click on a defect or drag the tool if you want to remove something like a crack in the wall. There are advanced techniques for smoothing and adjusting skin texture and tone, so don’t expect miracles either with the Spot Healing Brush.
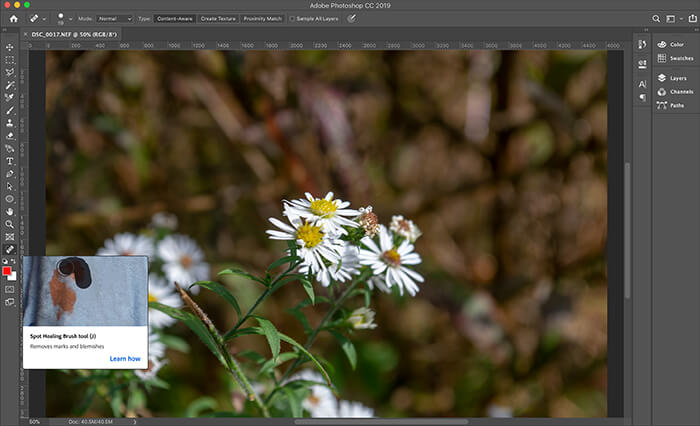
The Spot Healing Brush works by sampling the area around where the tool is being applied and using that information to remove the defect. Sometimes this sampling doesn’t work as desired. If you don’t like what happened, you can use the UNDO command (Control-Z on PC’s or Command-Z on Macs) or delete the action in the History pane. The History can be useful for backing up if your editing went too far.
If you undo the Spot Healing Brush, you can try changing the size of the brush. The square bracket keys [ and ] can increase or decrease the brush size. Brush size also has an effect on how it alters the image.
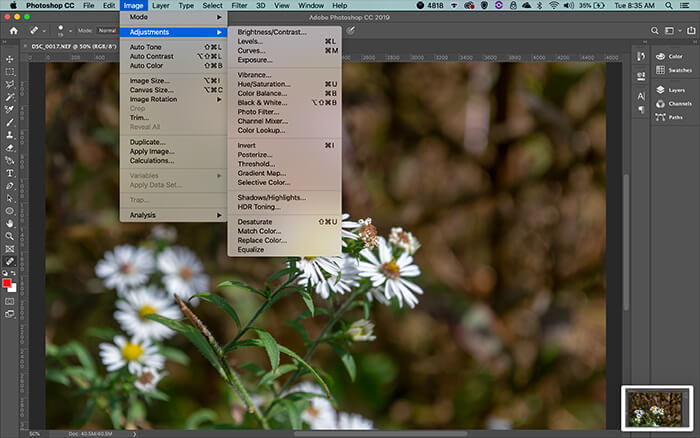
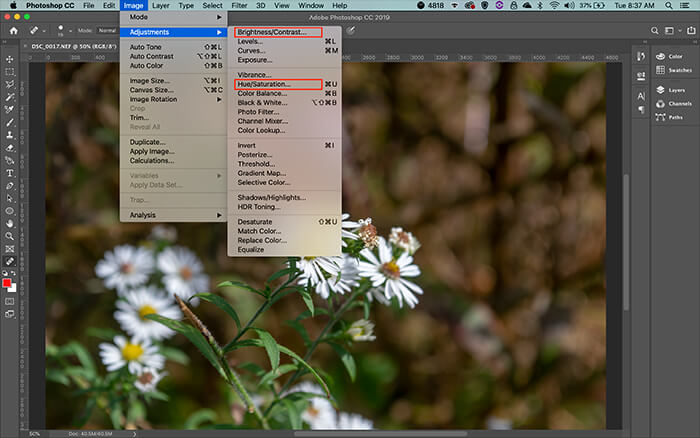
To adjust the brightness and contrast, click on the IMAGE menu item at the top, then ADJUSTMENTS, and you will find the BRIGHTNESS and CONTRAST feature. Sometimes it can be a challenge to manipulate the sliders without blowing out the highlights or going to far in another direction, but this is a simple function that can really help to make your image pop. The catch here is adjusting brightness and contrast will never compensate for an image that is not exposed properly or the lighting is poor. If the light source is behind your subject and causing the front of the subject to be dark, brightness and contrast will help but you’re not going to solve the problem completely.
IMAGE, ADJUSTMENTS, then HUE/SATURATION allows you to crank up the colors or tone them down. An image that is a bit flat can be transformed greatly by adjusting the Brightness/Contrast and then turning up the colors a bit with Hue/Saturation.
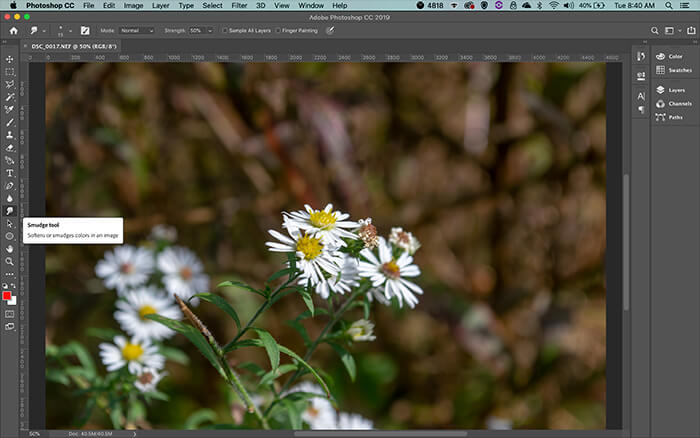
When you begin to learn additional ways to manipulate your images, you will find there is always a cost in that making one kind of adjustment may degrade the image in another way. Frequently what happens is there may be some noise or graininess in the image. Underexposed areas can be subject to noise.
There are two simple ways to remove noise. One is to use the SMUDGE tool. Adjust the size of the brush and the strength of the smudge effect and then apply the tool to the area with noise. Undo the action and change the settings of the brush if you don’t like the results right off. Sometimes you can overdo it so keep trying until you’re comfortable with your settings and technique.
Noise can be removed in the same way by using the BLUR tool. Both SMUDGE and BLUR can have the same effect for removing noise though the tools can be very different when using them for other editing techniques.
So that’s how you get started with Photoshop. If you’re shooting in RAW, adjust the image to your personal preference when using the CAMERA RAW editor mentioned at the beginning of this article. Use the Spot Healing Brush to remove spots, stains, lint, and other defects. Brightness/Contrast and Hue/Saturation can add a lot of pop to an image that is flat or not exposed properly. Then you can use the Blur or Smudge tool to remove noise and graininess.
And yes, what has been described above is extremely simple, but these basic functions will go very far in adjusting your images to make them more appealing. When you’re first starting out in Photoshop it’s best to keep it simple and easy. Other blogs and tutorials go too fast and too deep and beginners get lost and quickly lose interest. Do you really want to get into layering, masking, and other editing techniques so quickly? By following the simple processing in this blog, you can get results quickly and begin to feel confident in what you’re doing. It’s no fun learning something new if you spend hours and hours going nowhere and having nothing to show for it.
Just focus on making your images look more professional and free from defects when starting out. When you’re ready for the next step it will be because you have mastered some of the fundamentals and you’ll be ready to move on. Result-driven progress is much better than getting lost and mired in complicated tutorials. After all, photography is supposed to be fun!