

Diamond painting is a relatively new craft hobby that has gained immense popularity in recent years. It is a combination of two popular art forms, mosaic art, and paint by numbers. The process of diamond painting involves using tiny resin “diamonds” to create a shimmering, sparkling piece of art.
Diamond painting is a perfect blend of creativity and convenience, making it appealing to both newbies and seasoned crafters. The process is simple and easy to follow, allowing anyone to create a beautiful masterpiece without any prior experience. With the help of a coded adhesive canvas, one can create a stunning piece of art by applying thousands of tiny resin diamonds.
If you are looking for a fun and relaxing activity to do in your free time, diamond painting is an excellent choice. It is a great way to unwind after a long day and express your creativity. With so many different designs to choose from, there is something for everyone, whether you are a beginner or an experienced crafter.
Understanding Diamond Painting
What is Diamond Painting?
Diamond painting is a fun and rewarding crafting method that merges mosaic art and paint by numbers. It involves using tiny resin “diamonds” to create a sparkling and shimmering artwork on a coded adhesive canvas. The canvas is pre-printed with a design that is divided into sections, each marked with a number or symbol that corresponds to a specific color of diamond. The diamonds are then applied to the canvas using a special applicator tool, creating a beautiful and intricate work of art.
Diamond painting is a relatively new craft hobby that has gained popularity in recent years. It is often compared to cross-stitching and paint by numbers, but with a unique twist that makes it stand out. Unlike cross-stitching, which involves stitching thread through a fabric grid, diamond painting uses small, faceted resin diamonds to create a 3D effect on the canvas. And unlike paint by numbers, which uses paint to fill in numbered areas of a canvas, diamond painting uses diamonds to create a sparkling, textured effect.
Diamond Painting Vs. Paint By Numbers
While diamond painting and paint by numbers may seem similar at first glance, there are some key differences between the two. Paint by numbers involves filling in numbered areas of a canvas with paint, using a color key to match the paint colors to the numbers. Diamond painting, on the other hand, involves applying small resin diamonds to a coded adhesive canvas, creating a sparkling and textured effect.
One advantage of diamond painting over paint by numbers is that it is easier to achieve a professional-looking result. With paint by numbers, it can be difficult to get the paint to look smooth and even, especially if you are a beginner. With diamond painting, the diamonds are pre-cut and pre-sorted, making it easy to achieve a consistent and polished finish.
Another advantage of diamond painting is that it can be more relaxing and therapeutic than paint by numbers. The repetitive motion of applying the diamonds to the canvas can be soothing and meditative, making it a great way to unwind after a long day.
In summary, diamond painting is a fun and rewarding craft hobby that combines the best of mosaic art and paint by numbers. With its sparkling and textured finish, it is a unique and beautiful way to create your own works of art.
Getting Started with Diamond Painting
Diamond painting is a fun and relaxing craft that combines the beauty of mosaic art with the simplicity of paint by numbers. If you’re new to diamond painting, don’t worry – it’s easy to get started with just a few basic supplies.
Choosing Your Diamond Painting Kit
The first step in getting started with diamond painting is to choose a kit that’s right for you. Diamond paintings come in a myriad of artistic kits, sizes and styles, so it’s important to choose one that matches your skill level and interests.
Beginners may want to start with a smaller kit that includes a simple design and fewer colors. More advanced crafters may enjoy larger canvases with more intricate designs and a wider range of colors.
When choosing a diamond painting kit, look for one that includes all the supplies you’ll need, such as a canvas, drills, tray, wax, and tweezers. Some kits may also include a legend, which shows you which color corresponds to each symbol on the canvas.
Setting Up Your Workspace
Once you’ve chosen your diamond painting kit, it’s time to set up your workspace. Find a clean, flat surface where you can work comfortably for an extended period of time. A table or desk is ideal, but any flat surface will do.
Next, unroll your canvas and flatten it out on your workspace. Make sure it’s completely flat and free of wrinkles or creases. If necessary, you can use a rolling pin or similar object to smooth out any wrinkles.
Now it’s time to prepare your drills. Pour them into the tray and shake it gently to spread them out evenly. You can use a drill pen or multi-placer to pick up the drills and place them on the canvas.
Before you start placing drills, you’ll need to apply wax to the tip of your drill pen or multi-placer. This will help the drills stick to the pen and make it easier to place them on the canvas. You can use a wax pad to apply the wax.
With your workspace set up and your supplies ready, you’re now ready to start your diamond painting project. Just follow the legend and place the drills on the canvas one by one, and before you know it, you’ll have a beautiful work of art that you can display with pride.
The Diamond Painting Process
Diamond painting is a fun and rewarding craft that combines the techniques of mosaic art and paint by numbers. Here’s a breakdown of the diamond painting process:
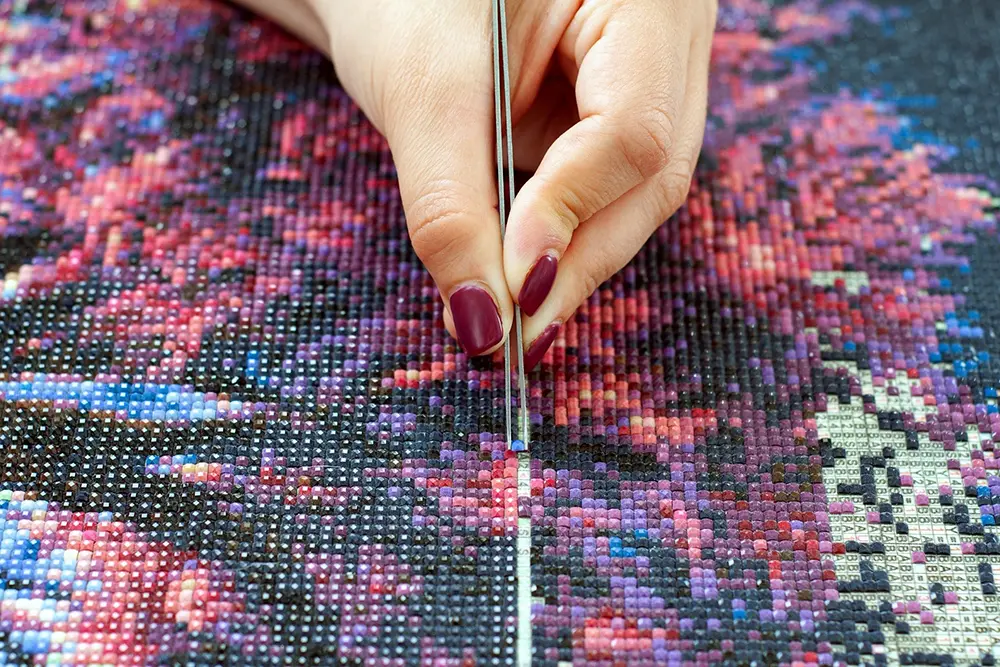
Understanding the Canvas
The canvas is the foundation of the diamond painting. It is printed with a design that corresponds to a key of colors and symbols. Each symbol represents a specific color of drill, which is the small resin diamond that is used to create the final image.
The canvas is covered in a layer of adhesive that holds the drills in place. It is important to keep the canvas flat and free from wrinkles or kinks to ensure the drills are placed accurately.
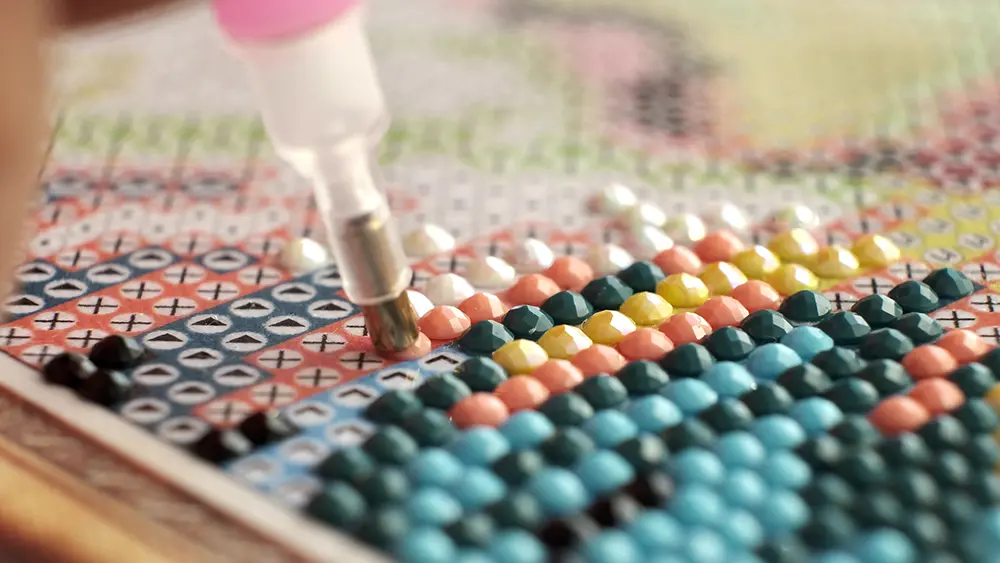
Placing the Drills
To create the diamond painting, the drills are placed onto the canvas one at a time using a special tool. The most common tool is a drill pen, which is a small stylus with a wax tip that picks up the drills and places them onto the canvas.
Tweezers can also be used to place the drills, especially for more intricate designs or for people who have difficulty using the drill pen.
The drills are placed onto the canvas in a specific pattern to create the final image. It is important to follow the key and the pattern closely to ensure the final image is accurate.
Using the Tools
In addition to the drill pen and tweezers, there are other tools that can be used to make the diamond painting process easier and more efficient.
A multi-placer tool can be used to place multiple drills at once, which can save time and reduce hand fatigue. Wax can also be used to help the drills stick to the drill pen or tweezers more easily.
Overall, the diamond painting process is simple and easy to learn. With a little practice, anyone can create beautiful and intricate diamond paintings that will be treasured for years to come.
Advanced Techniques and Tips
Mastering the Multi-Placer
For those who have mastered the basic diamond painting techniques, it’s time to take on the challenge of the multi-placer. This tool allows you to place multiple drills at once, speeding up the process and creating a more uniform look. To use the multi-placer, simply load up the drills onto the tool and place them onto the canvas in the designated spots. It’s important to note that the multi-placer is best used on larger canvases with larger areas of the same color.
Maintaining Your Canvas
One of the most important aspects of diamond painting is keeping your canvas in good condition. To prevent dust and debris from settling onto your canvas, cover it with a protective film when not in use. If your canvas becomes wrinkled or creased, use a warm iron on the reverse side to flatten it out. Additionally, avoid touching the adhesive surface of the canvas with your hands to prevent oils and dirt from transferring onto it.
Managing Spare Drills
As you progress through your diamond painting project, you may accumulate spare drills. It’s important to keep these organized and labeled to prevent confusion and ensure you have enough drills to complete your project.
Some diamond painters prefer to store their spare drills in small plastic bags or containers labeled with the color code. Others may choose to use a drill organizer tray with labeled compartments for each color. Whatever method you choose, make sure to keep your spare drills organized and easily accessible.